Your Free Sourdough
Starter Kit Is Ready
Everything you need to bake your first perfect loaf — from hydration math to day-by-day schedules. Scroll down to access all six sections.
A welcome email from Sourdough Academy has been sent to your inbox with a link back to this page.
Section 1 of 6
15-Page Beginner Guide
The complete beginner's manual — click any page to read. No fluff. No filler. Just what works.
Sourdough is a living process, not just a recipe. Your starter is a pet — it needs regular feeding, warmth, and attention. The first two weeks will be messy, unpredictable, and occasionally smelly. That's completely normal. Every professional baker started exactly where you are right now. Keep a baking journal. Document everything. Your failures are data, not disasters.
Section 2 of 6
Hydration Calculator
Auto-calculates water ratios for any flour type. Accounts for your starter's hydration too.
Dough Parameters
Standard absorption, very forgiving
The sweet spot for most sourdough. Balanced handling and crumb.
Recipe Output
All-Purpose Flour typically needs about 300g water for 500g flour at its natural absorption rate. Your target of 70% may need a slight adjustment based on your environment.
Section 3 of 6
7-Day Baking Schedule
Exactly when to feed, fold, shape, and bake. Follow this timeline for your first two loaves.
Starter Check & First Loaf Prep
Day 1 of your sourdough journey
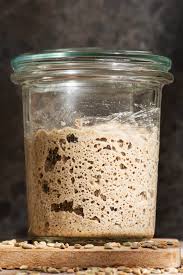
Check your starter. If it doubles within 4–6 hours of feeding, it's ready. If not, feed it 1:1:1 and wait.
Read through the beginner guide (Section 1) and watch Video 1: 'The First Mix.'
Build your levain for tomorrow's bake: 20g starter + 40g flour + 40g water. Cover and leave at room temp overnight.
Pro tip: If your starter isn't ready, spend today doing an extra feeding and start the levain tomorrow evening instead.
Section 4 of 6
Equipment Checklist
What you actually need — and what you can skip. Build your kit for under $50.
0 of 14 items checked
Sourdough is about ratios, not cups. A $20 scale is the single most important tool.
Substitute: None — this is non-negotiable
Your starter's home. Glass lets you see bubbles and activity clearly.
Substitute: Any clean plastic container
Large enough for dough to triple in size during bulk fermentation.
Substitute: Any large bowl you already own
Handles sticky dough, divides portions, and cleans your work surface.
Substitute: A sturdy plastic card or old credit card
Creates a professional steam chamber for oven spring and crust development.
Substitute: Heavy pot with tight lid, or cast iron pan + foil tent
Gives beautiful spiral patterns and supports the loaf during proofing.
Substitute: Bowl lined with a well-floured tea towel
Clean, precise scoring that controls oven spring and looks beautiful.
Substitute: Fresh utility knife blade (held carefully)
Takes the guesswork out of water temp, dough temp, and doneness.
Substitute: Guesswork (not recommended)
Makes transferring dough to a hot Dutch oven effortless and safe.
Substitute: Silicone baking mat
Doesn't absorb moisture, creates crisp non-stick patterns on the loaf.
Substitute: Semolina or coarse cornmeal
For adding steam if baking without a Dutch oven.
Substitute: Ice cubes on a preheated pan
Helps beginners get even, consistent slices without crushing the crumb.
Substitute: A steady hand and a serrated knife
Keeps your starter warm in cold kitchens. Wrap in a towel, set to low.
Substitute: Top of refrigerator, oven with light on
Eco-friendly storage that keeps crust crisp and crumb soft for 2–3 days.
Substitute: Clean tea towel or paper bag
Section 5 of 6
Troubleshooting Sheet
The 14 most common problems — and exactly how to fix them.
Section 6 of 6
3 Bonus Video Lessons
Exclusive content not available on YouTube. Chef Maria Rossi walks you through the most critical moments.
The First Mix: From Flour to Dough
18:24 — Click to play
Watch Chef Maria Rossi create a sourdough dough from scratch in real time. See exactly how the dough transforms during autolyse, how to incorporate a levain without overworking, and the moment the gluten 'comes alive' under your hands. This video covers the entire mixing phase with close-ups you can't get from reading alone.